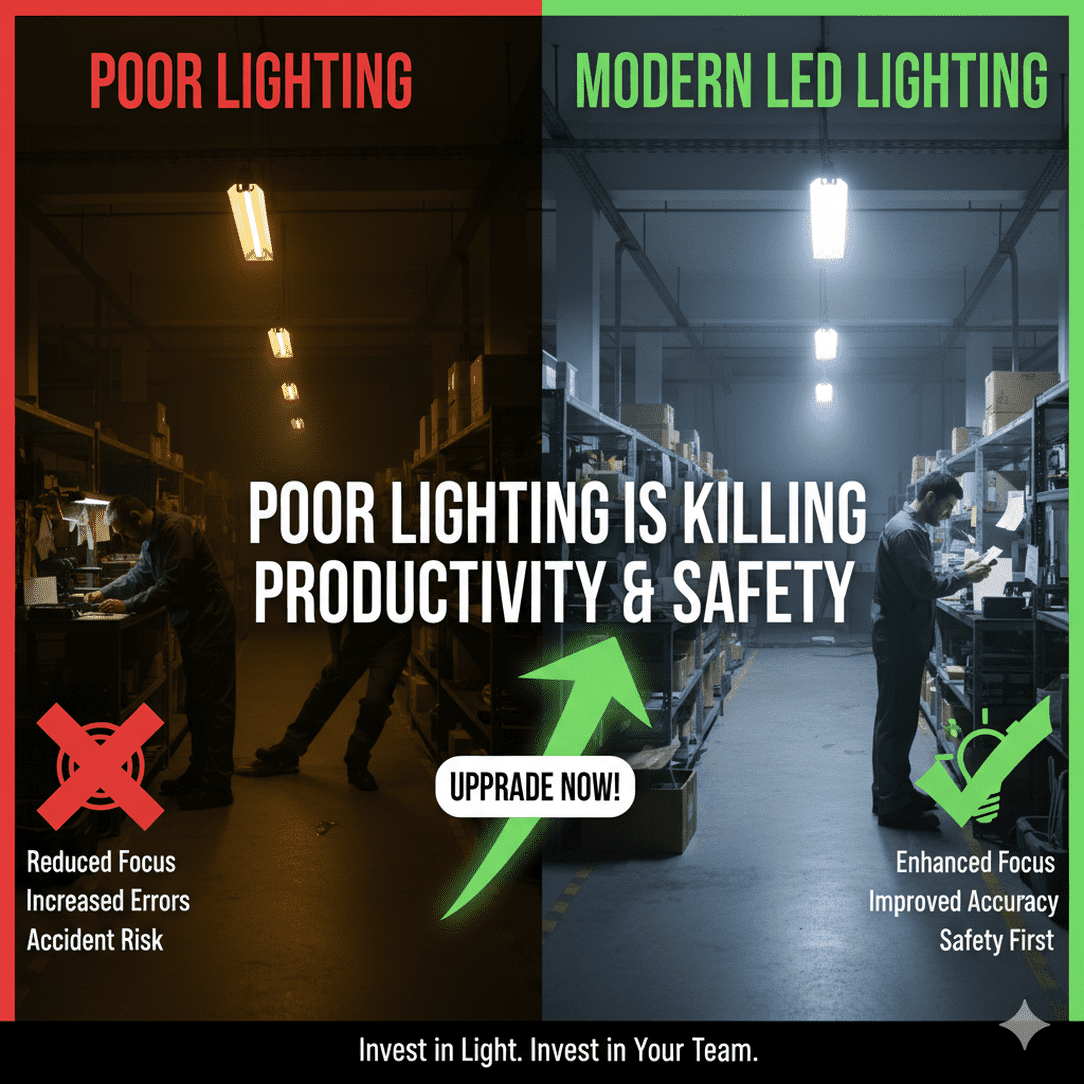
Imagine you’re in your workshop, trying to work on a delicate task—maybe wiring a circuit board or fine sanding a wood piece—but the shadows are harsh, the corners are dim, and the overall illumination feels uneven. You strain your eyes, make more mistakes, and find yourself fatigued faster.
This is a common problem many workshop owners or hobbyists face. Without proper lighting:
- You risk errors and defects in your work.
- You slow down, because insufficient light means slower, cautious movements.
- Safety becomes a concern: tools, wires, and sharp edges become harder to see in dim corners.
- Your energy bills rise if you’re relying on inefficient fixtures.
In short: a subpar lighting setup undermines productivity, safety, and comfort. If only there were a one-stop solution to upgrade your entire lighting setup so you can work smarter, not harder.
Agitation: The Hidden Costs of Sticking with Bad Lighting
Poor lighting isn’t just an inconvenience—it has real costs that pile up over time:
-
Increased Errors & Rework
When visibility is bad, small mistakes become common: misaligned cuts, miswired circuits, misread measurements. Each error costs you time, materials, and frustration.
-
Eye Strain, Fatigue & Health Issues
Working under poor light forces your eyes to adapt, leading to headaches, tiredness, even long-term vision issues.
-
Safety Risks
Dim or flickering lighting increases the risk of accidents—tripping over tools, slipping on stray bits, or mishandling sharp instruments.
-
High Electricity Costs
Many traditional fixtures (fluorescent, halogen, metal halide, or incandescent) are energy-hungry. As the reference site notes, conventional workshop lighting often “suckers for energy” and will cost “a bomb” in utility bills.
-
Inconsistent Light Quality
Color temperature, glare, shadows, dark zones—all contribute to a disorienting environment. For instance, using lights with mismatched CCT (correlated color temperature), or placing fixtures poorly, can cast undesirable shadows.
The frustration mounts, and the pressure grows: Whether you’re doing precision fabrication, assembly, or repair work, a poor lighting environment becomes a drag on performance and morale.
Solution: A Smart, Layered Approach to Workshop Light
Upgrading your workshop lighting with thoughtful, efficient design solves all those problems—and can be cost-effective in the long run. Below is a structured strategy to implement a superior workshop light setup.
-
Choose LED First – The Foundation of Modern Workshop Lighting
Switching to LED technology is the first, most impactful step. As the reference “Workshop Lighting” page emphasizes, LED workshop lights offer dramatic energy savings (up to ~75%) compared to traditional lighting.
Why LEDs?
- High efficacy (lumens per watt)
- Longer lifespan (many rated 50,000 hours or more)
- Low maintenance, no frequent ballast or bulb changes
- Flexibility in light color (CCT selectable)
- Dimmable and controllable (many models support 0–10V dimming)
-
Layer Ambient, Task & Accent Lighting
Don’t rely on a single fixture. A robust lighting plan uses layers:
- Ambient lighting for general illumination: Use high bay LED lights (e.g. UFO-style high bay) for larger workshop volumes. These serve as the “ceiling flood” that ensures overall brightness.
- Task lighting targeting critical work zones: LED tube lights, integrated tubes, or dedicated work lights (portable LED shop lights) deliver concentrated, shadow-free illumination exactly where you need it.
- Accent or supplementary lighting: Use wall-mount LED strips or directional lights to eliminate dark corners, highlight storage shelves, or add depth.
-
Mind Color Temperature & Color Rendering (CCT & CRI)
Selecting the right CCT (temperature) and CRI (color rendering index) is crucial:
- For general workshop use, go for 4000K–5000K — a neutral to daylight white tone, crisp but not overly harsh.
- Avoid extremes: <3000K becomes too yellow; >6500K may feel cold and fatiguing.
- Also choose high CRI (80+) to ensure colors look natural—essential when working with paints, wiring insulation, or materials where color distinction matters.
-
Optimize Mounting & Fixture Positioning
Where and how you place your workshop light fixtures matters as much as what kind:
- Height & spread: For high bay lights, select mounting height and beam angle to cover floor area with even light.
- Avoid glare: Don’t aim lights directly into your eyes or across reflective surfaces.
- Stagger or overlap: Arrange fixtures so their light cones overlap, eliminating dark zones.
- Supplement edges & corners: Use lower-level or wall-mounted lights to support low-angle oblique lighting.
-
Dimming, Controls & Sensors
Smart controls enhance comfort, longevity, and energy savings:
- Use dimmable LEDs (many workshop lights support 0–10V dim) for adjusting brightness to task demands.
- Add motion sensors, timers, or daylight sensors so lights dim or turn off when not needed.
- Consider zoning: separate circuits so bench lighting, general lighting, or storage lighting can operate independently.
-
Choose IP Ratings & Robust Build
Workshops often produce dust, vibration, or moisture. Select workshop light fixtures that are:
- IP-rated (e.g. IP65 for dust/wet resistance)
- Rigidly built (die-cast aluminum bodies, sturdy mounting brackets)
- Heat-managed (good thermal design to avoid overheating and preserve LED longevity)
-
Plan for Expandability & Upgrades
As your workshop evolves, your lighting should adapt:
- Choose modular systems (e.g. linkable LED shop lights) that let you easily add more fixtures.
- Use fixtures that support different CCT modes or dimming methods so you can repurpose them in future zones.
- Leave extra conduit or wiring capacity to avoid major reworks.
Real-World Example: LEDMyPlace’s Workshop Light Options
On the LEDMyPlace “Workshop Lighting” section, the product listings already illustrate many of these principles in action.
- Their UFO high bay LED lights (e.g. 150 W, 240 W adjustable versions) deliver high lumens across large overhead spans.
- They also offer LED tube lights, integrated tubes, and LED shop lights ideal for bench, aisle, or under-shelf lighting.
- Features like CCT-changeable, dimmable, and IP-rated options appear frequently in their filters.
By combining those product types into a layered plan, you can build a workshop lighting system that is efficient, flexible, and high-performing.
Summary Checklist: Your Workshop Light Upgrade Plan
| Step | Key Focus | Quick Tip |
| 1 | Switch to LED | Replace old fluorescents or HID with high-efficacy LED fixtures |
| 2 | Layer lighting | Use ambient + task + accent for full coverage |
| 3 | Pick correct CCT & CRI | Aim for ~4000–5000K, CRI ≥ 80 |
| 4 | Fixture placement | Overlap beams, avoid glare, illuminate edges |
| 5 | Add controls | Use dimmers, motion sensors, and separate zones |
| 6 | Use rugged, IP-rated fixtures | Choose dust- and moisture-resistant designs |
| 7 | Build for growth | Use modular, upgradable lighting solutions |
Final Thoughts
A well-designed workshop light strategy transforms not just your workspace, but your entire workflow. You move from fighting shadows and wasting energy, to working confidently in a bright, efficient environment.
By prioritizing LED fixtures, layering your lighting, choosing the right color temperature, and planning smart placement and controls, you create a workshop that supports precision, safety, and comfort. Drawing inspiration from LEDMyPlace’s workshop lighting solutions also shows how practical, ready-made products can be integrated into your custom plan.
Want help building a fixture-by-fixture layout for your specific workshop space (size, ceiling height, work zones)? I can assist with that too—just share your workshop dimensions and tasks.