Your CRV is more than just a vehicle; it’s part of your daily life. From road trips to grocery runs, it keeps you moving smoothly. At the heart of this reliability lies an often-overlooked component: the alternator. This little powerhouse is crucial for keeping your car’s battery and electrical system running efficiently. Yet, many drivers don’t give much thought to maintaining it until problems arise. A well-maintained CRV Alternator can extend its lifespan significantly, saving you time and money in the long run. So why not take a proactive approach? By understanding how your alternator works and implementing some essential maintenance tips, you can ensure that your trusty Honda remains dependable for years! Let’s dive into practical ways to keep that alternator humming along nicely while preventing unexpected breakdowns on the road ahead.
Understanding the Role of Your Alternator
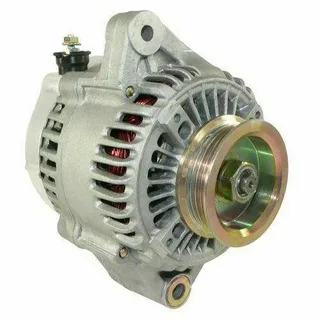
The alternator is a vital component of your CRV’s electrical system. Its primary role is to generate electricity while the engine runs, ensuring that all electronic devices in your vehicle function smoothly. The alternator powers everything from lights and infotainment systems to power windows and climate control.
This device converts mechanical energy into electrical energy using electromagnetic induction. When you start your car, the engine’s rotation drives the alternator’s rotor, creating an electric current. This process charges the battery and provides continuous power for various components.
A well-functioning alternator keeps your battery charged so it doesn’t drain unexpectedly. If you’re driving with a faulty or weak alternator, you might notice dimming headlights or erratic dashboard lights—signs that something isn’t right.
Additionally, accessories like GPS and sound systems draw more power from the battery when used frequently. A robust alternator can handle this extra load without faltering.
Understanding this component’s importance can motivate you to keep up with its maintenance needs!
Routine Inspection and Diagnostics: Honda Crv Alternator Replacement
Regular inspections are vital for ensuring your Honda Crv Alternator Replacement operates smoothly. Making this a part of your vehicle maintenance routine can save you from unexpected breakdowns and costly repairs down the line.
Start by checking the alternator’s physical condition. Look for any signs of wear, corrosion, or damage on the unit. These visual indicators can often tell you if something is amiss before it becomes a bigger issue.
Next, consider conducting voltage tests to monitor performance levels. A simple multimeter can help measure whether your alternator is generating adequate power. Ideally, readings should be between 13.5 to 14.5 volts when the engine runs.
Listening closely while driving offers another layer of diagnostics. Unusual noises like grinding or whining could point to problems with bearings or other internal components that may require attention sooner rather than later.
Keep an eye on dashboard warning lights related to battery and charging systems; they’re there for a reason! Ignoring these alerts could lead to significant issues affecting your CRV’s electrical system and overall reliability over time.
Keeping Connections Clean and Secure
Dirty or loose connections can significantly hinder the performance of your CRV alternator. Regularly checking these connections is crucial for maintaining optimal functionality. Dust, dirt, and corrosion can accumulate over time, leading to poor electrical flow.
Start by inspecting all wiring harnesses connected to the alternator. Look for any signs of wear or damage that could affect connectivity. If you notice frayed wires or corroded terminals, it’s essential to address them promptly.
Cleaning connections is straightforward. Use a wire brush or a soft cloth dipped in electrical cleaner to remove grime and oxidation from terminals. Do not apply too much pressure; gentle cleaning works best without risking further damage.
Once cleaned, ensure that each connection is tight but not overly tightened, which could lead to breakage. A snug fit prevents vibrations from loosening during drives on uneven surfaces.
After securing everything back together, consider applying dielectric grease at the connections for added protection against moisture and corrosion in the future. This simple maintenance step can significantly extend your CRV alternator’s life while enhancing its overall efficiency.
Managing Belt Tension and Condition
The belt connected to your CRV alternator plays a crucial role in its performance. If the tension is too loose, it can slip and fail to generate adequate power. Conversely, if it’s too tight, it could cause unnecessary wear on both the belt and the alternator itself.
Inspecting for Signs of Wear
Checking for cracks, fraying, or other visible damage helps determine when a belt replacement is necessary to avoid unexpected failures.
Adjusting Belt Tension Properly
Knowing where your vehicle’s adjustment mechanism is located ensures the belt maintains optimal tension, preventing unnecessary strain on the alternator.
Understanding Temperature Effects on Belt Longevity
Heat accelerates material degradation, while extreme cold can cause brittleness—seasonal inspections help identify wear-related concerns.
Inspecting and Adjusting Belt Tension
Belt tension plays a crucial role in the performance of your CRV alternator. When the belt is too loose, it can slip or even detach, leading to insufficient power generation. This can cause all sorts of electrical issues in your vehicle.
On the other hand, if the belt is too tight, it can put unnecessary strain on the alternator and other components. This might lead to premature wear and tear or even damage that could necessitate expensive repairs. Regular inspection helps maintain balanced tension.
To check the belt tension, press down on it with moderate force; there should be a little give but not too much slack. Most manufacturers provide specifications for ideal tension levels based on your specific model year. Make sure to consult your owner’s manual for guidance.
Adjusting belt tension typically involves loosening bolts on either end of the alternator or using an adjustment screw mechanism located near the mounting bracket. Carefully follow manufacturer instructions when making adjustments to avoid damage.
While you’re at it, remember to inspect for signs of wear—cracks or fraying indicate it’s time for replacement rather than just adjustment. Keeping everything well-maintained contributes significantly to extending your CRV’s longevity and reliability.
Reducing Electrical Strain on the System: Honda Crv Alternator
Electrical strain can significantly impact the lifespan of your Honda Crv Alternator. The alternator is not just a simple component; it plays a crucial role in maintaining the electrical system’s health.
One effective way to reduce strain is by managing your vehicle’s electrical load. Avoid using multiple high-demand devices simultaneously, such as heated seats and air conditioning. This practice helps prevent overloading the alternator while driving.
Regularly checking for unnecessary accessories or modifications can also help minimize stress on the electrical system. Items like aftermarket lights and excessive audio systems may draw more power than your CRV’s factory settings are designed to handle.
In addition, consider upgrading components if you frequently push the limits with electronic gadgets. Installing a higher-capacity battery or an upgraded alternator might relieve consistent strain during heavy use.
Educating yourself about how various components interact can be hugely beneficial. Understanding which functions consume the most electricity allows you to make informed decisions regarding usage while ensuring optimal performance from your CRV alternator.
Preventing Overheating and Environmental Damage
Overheating can be a significant threat to your CRV alternator. It often results from prolonged use, especially in high-temperature environments. When the temperature rises too much, it alters the performance of electrical components and can lead to failure. Keeping an eye on engine temperature is crucial for maintaining your alternator’s health.
One way to prevent overheating is through proper ventilation around your engine bay. Ensure that air flows freely by regularly cleaning away any debris or dirt that could block airflow. This simple step can significantly affect regulating temperatures under the hood.
Another key factor is monitoring the cooling system within your vehicle. Regularly checking coolant levels and ensuring no leaks will help maintain optimal operating temperatures. A well-functioning cooling system supports the engine and protects sensitive components like the alternator.
Environmental damage can also wear down your CRV’s alternator over time. Exposure to moisture, road salt, or corrosive materials may cause corrosion on connections and wiring, leading to premature wear and tear.
To combat this issue, inspect all external parts of your alternator periodically for signs of rust or corrosion. Applying protective coatings designed for automotive use can safeguard against environmental factors that threaten durability.
Recognizing Common Issues and When to Seek Repairs
Recognizing issues with your CRV alternator can prevent unexpected breakdowns. Pay attention to the warning lights on the dashboard. If the battery light illuminates, it’s often a sign that your alternator isn’t charging properly.
Strange noises from the engine bay can also indicate problems. A grinding or whining sound may suggest worn bearings within the alternator, while a clicking noise could signal loose connections or failing components. Please don’t ignore these sounds; they are early indicators of potential failure.
Another common issue is dimming headlights or flickering interior lights. This might mean your alternator isn’t supplying enough power to keep everything running smoothly. It’s essential to address this promptly before it affects other electrical systems in your vehicle.
Keep an eye out for unusual smells, such as burning rubber or hot metal odours. These scents may indicate overheating due to excessive strain on the alternator, leading to more significant damage if not addressed quickly.
If you notice any of these symptoms, consider seeking professional repairs sooner rather than later. Ignoring them could result in complete failure and leave you stranded when you least expect it.
Conclusion
Taking good care of your CRV Alternator is essential for its longevity and performance. Regular maintenance can prevent unexpected breakdowns and costly repairs down the line. The tips shared throughout this guide serve as a roadmap to help you keep your alternator in top shape.
One key takeaway is that routine inspections play an invaluable role. Making it a habit to check connections, belts, and overall functionality will help you catch issues early on. A simple diagnostic test can save time and money by identifying problems before they escalate. Remember that cleanliness matters, too. Keeping electrical connections free from corrosion ensures optimal power flow. Even small debris or dirt can interrupt your system’s efficiency. Belt tension should never be overlooked, either. Properly adjusted belts reduce wear on both the alternator and other components in the engine bay, contributing to smoother operation. It cannot be stressed enough how important it is to understand when professional assistance is needed. If you’re facing persistent issues despite regular checks, don’t hesitate to consult a mechanic specialising in CRVs or automotive electrical systems for a thorough evaluation.
FAQs
How can I tell if my CRV Alternator is failing?
Signs of a failing CRV Alternator include dimming headlights, strange noises coming from the engine bay, or warning lights on your dashboard. If you experience these symptoms, it’s time for an inspection.
Is regular maintenance necessary for my CRV’s electrical system?
Absolutely! Regular checks not only prolong the life of your alternator but also ensure other components work harmoniously with it. This way, you avoid unexpected breakdowns.
Can I clean connections myself?
Yes! Cleaning terminal connections is relatively simple and can be done with basic tools. Just make sure to disconnect the battery first!
| Related Business Listings |
| Contact Directory |
| Local Business Profiles |