Properly installed flashing serves as the primary barrier against water intrusion at the most vulnerable points of a structure. Homeowners often focus on shingles or metal panels, yet the thin strips of material around joints and valleys dictate how long the entire system lasts. Residential Roofers in Hellertown, PA, frequently see roof failures caused not by the age of the shingles, but by the deterioration or incorrect installation of these metal components. Protecting the structural integrity of a house requires a clear understanding of how these small details prevent massive repair bills. Roof systems rely on shed-style mechanics, meaning every layer must overlap the one below it to guide gravity-fed water safely to the ground. Flashing acts as the bridge between different building materials, such as wood, masonry, and asphalt. Without these metal transitions, water would seep into the gaps where a chimney meets the roof deck or where two roof planes form a valley. Investing in high-quality metalwork ensures that the most expensive parts of a home, like the rafters and ceiling joists, remain dry and free from rot for decades.
Understanding the Mechanics of Water Shedding
Flashing functions by creating an impervious path for runoff to follow as it moves down the slope of a building. Metal strips are bent at specific angles to match the pitch of the roof, tucked underneath shingles on the uphill side and over shingles on the downhill side. This technique prevents moisture from “wicking” or traveling upward through capillary action. Water follows the path of least resistance, and the goal of a roofer is to make sure that path never leads into the attic space. Using heavy-gauge metals ensures that the barriers do not warp or buckle under intense summer heat. Durable systems utilize a combination of base flashing and counter-flashing to provide a secondary layer of defense against wind-driven rain.
Identifying Common Materials for Maximum Durability
The choice of material impacts both the cost and the lifespan of the roof because different climates and architectural styles necessitate specific metals to ensure chemical compatibility.
- Galvanized Steel: This is the most common choice for residential projects because it is cost-effective and provides decent corrosion resistance when coated with zinc.
- Aluminum: Lightweight and easy to form, aluminum is highly resistant to rust, making it a favorite for coastal regions where salt air quickly degrades lesser metals.
- Copper: Known as the premium option, copper offers extreme longevity and a beautiful patina, though it requires specialized soldering skills to install correctly.
- Stainless Steel: This material provides the highest level of protection against harsh environmental pollutants and remains structurally sound for over half a century.
The Dangerous Consequences of Flashing Failure
Small leaks behind a piece of loose metal rarely stay small for long since water trapped behind the siding or under the underlayment fosters mold growth. Once the decking softens due to moisture, the entire roof loses its ability to hold fasteners, leading to a much earlier replacement than originally planned. Homeowners often notice brown spots on their ceilings or peeling paint around window frames, which are classic signs that the flashing has reached the end of its functional life. Repairing a leak early saves thousands of dollars in structural restoration costs. Neglecting these minor gaps allows wood-destroying insects to find entry points into the home’s framing. Continuous moisture exposure eventually leads to a complete failure of the roof’s load-bearing capacity.
Step One: Conducting a Comprehensive Roof Perimeter Assessment
Starting a project requires a thorough visual inspection of every point where the roof surface is interrupted by a chimney, vent, or wall. Look for rusted metal, cracked caulking, or pieces that have pulled away from the masonry. Professionals use a pry bar to gently lift shingles near the suspected leak to see if the metal underneath is still intact. Evidence of water stains on the plywood indicates that the existing flashing is either improperly sized or has suffered mechanical damage from hail or debris. Assessing the condition of the surrounding shingles is also necessary, as brittle shingles may break during the flashing replacement process.
Step Two: Removing Old Materials and Preparing the Surface
Removing the damaged flashing involves carefully extracting the nails that secure the metal to the roof deck. Clean away old roofing cement and debris to create a smooth surface for the new installation. Any rotted wood discovered during this phase must be replaced immediately to ensure the new fasteners have a solid bite. Sanding down rough edges on the existing shingles helps the new metal slide into place without causing tears. A clean workspace prevents small granules of asphalt from getting trapped under the metal, which could otherwise create tiny gaps for water to enter.
Step Three: Installing Base and Step Flashing for Vertical Walls
Installing step flashing involves placing individual L-shaped pieces of metal at every course of shingles where the roof meets a sidewall. Each piece must overlap the one below it by at least two inches to create a continuous water-tight seal. Nailing the flashing only to the roof deck, rather than the wall, allows the house to settle without buckling the metal. This independent movement is vital for preventing cracks in the waterproofing layer over time. Proper alignment ensures that the vertical leg of the metal is tall enough to be covered by the house siding or counter-flashing.
Step Four: Securing Chimneys with Counter-Flashing Techniques
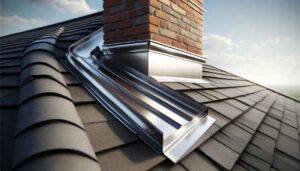
Chimney protection requires a two-part system consisting of a base layer and a decorative but functional outer layer. Professionals cut a shallow groove into the masonry mortar joints to “reglet” the counter-flashing, which is then tucked into the brickwork. This method prevents water from running down the side of the chimney and getting behind the base metal. High-quality polyurethane sealants fill the reglet joint to provide a flexible, waterproof bond. Properly bent corners, often referred to as “crickets” on wider chimneys, divert water around the back of the structure to prevent pooling.
Step Five: Sealing Penetrations and Final Quality Checks
Plumbing vents and skylights require specialized boots or custom-fabricated metal pans to ensure a tight fit. Sliding the top flange of the vent cover under the shingles above it creates a natural shingle-effect that sheds water. Apply a small amount of high-grade roofing sealant to nail heads to prevent moisture from seeping through the fastener holes. A final walk-through involves checking that every piece of metal is snug against the roof surface and that no gaps exist at the transitions. Testing the area with a garden hose can simulate rainfall to verify that the water follows the intended path into the gutters.
Professional Installation vs. Common Shortcuts
Reliable contractors follow strict protocols to ensure water flows over the flashing rather than under it because mistakes in this area are the leading cause of “mystery leaks.”
- Step Flashing Technique: Professionals overlap individual L-shaped pieces with every course of shingles to create a redundant water-shedding surface.
- Counter-Flashing Integration: Deeply embedding metal into masonry mortar joints prevents water from running down the face of a chimney and getting behind the base layer.
- Proper Fastening: High-quality installers avoid over-nailing, which can cause the metal to buckle or pull away during temperature fluctuations.
- Drip Edge Utilization: Installing metal along the eaves ensures water clears the fascia board and enters the gutter directly without rotting the roof edge.
How Regular Inspections Extend Roof Life
Environmental stress causes metal to expand and contract, which can eventually break sealant bonds over several seasons. Inspecting these areas twice a year allows for minor resealing or nail-tightening before water manages to penetrate the deck. Proactive maintenance is significantly cheaper than replacing drywall and insulation after a major storm. Look for signs of “pitting” in aluminum or rust streaks on steel, as these indicate that the protective coating has worn away. Catching these issues during a routine check prevents the need for a full-scale emergency repair during peak rainy seasons.
The Economic Value of High-Quality Flashing
Choosing premium materials for the flashing system adds a negligible amount to the total cost of a roof replacement but doubles the protection level. Cheap, thin-gauge metals often rust through in less than a decade, forcing a premature teardrop of perfectly good shingles. Investing in copper or thick stainless steel provides peace of mind and increases the resale value of a property. Home inspectors look closely at flashing during real estate transactions, and a well-maintained system signals that the owner has taken care of the entire structure. Quality work pays for itself by eliminating the recurring costs of patching minor leaks.
Conclusion:
The longevity of a roof depends on the strength of its weakest link. While flashing is often the least visible part of a roofing project, it carries the heaviest burden in terms of weatherproofing. Prioritizing high-quality materials and expert craftsmanship ensures that a home remains a dry, safe environment for decades. Working with experienced professionals who understand local weather patterns helps in choosing the right metal for the job. A roof is only as good as its transitions, and proper flashing is the ultimate insurance policy for any home.
FAQs
How often should roof flashing be replaced?
Most flashing lasts as long as the shingles, typically between twenty and thirty years, though it may require maintenance or resealing every five years. Metal components outlive asphalt shingles in many cases, but they should be replaced during a full roof installation to ensure the new system starts with a fresh seal.
Can I repair leaking flashing without replacing the whole roof?
Patching small holes or resealing loose edges is possible if the underlying wood deck is still in good condition. Complete replacement of specific sections is often necessary if the metal has rusted through or was installed incorrectly during the original construction.
What is the most durable material for roof flashing?
Copper is widely considered the most durable material due to its natural resistance to corrosion and its ability to last over fifty years. Stainless steel is a close second, offering immense strength and protection in industrial or high-pollution environments.
Why does my chimney leak even with new flashing?
Leaks often occur because the counter-flashing was not properly recessed into the mortar joints of the chimney. Water can run down the porous brick surface and slip behind the metal if it is only held in place by caulk rather than a physical reglet cut.